Saturday, February 5, 2011

VFD conversion project started

I have been wanting to upgrade the drive on my mill to a VFD in order to have more control over the spindle speed and the reduce to need for moving the belts to change speed.

I found two great deals on E-bay and finally made a purchase of a VFD and 3-phase motor. The VFD and motor are both 2hp units and this should give me an upgrade over the 1.5hp (questionable Chinese hp) of my mill's current motor as well as a bit more available torque when the drive is a lower RPMs. I'll still need to change the belt location to change within speed ranges as the AC motors tend to overheat when driven too slowly but I should be able to move within the range and fine tune cutting speed with just a turn of the speed potentiometer. The project cost should be under $300 as the VFD and motor were both obtained for under $100 each and I have some other items which picked up for free. I need to purchase control switches and a potentiometer knob (locking with indicator) and some other sundry items before I can start the conversion.

By the way: The motor weighs in at 70lbs. I wonder what the UPS man must be thinking when he stops at my house!


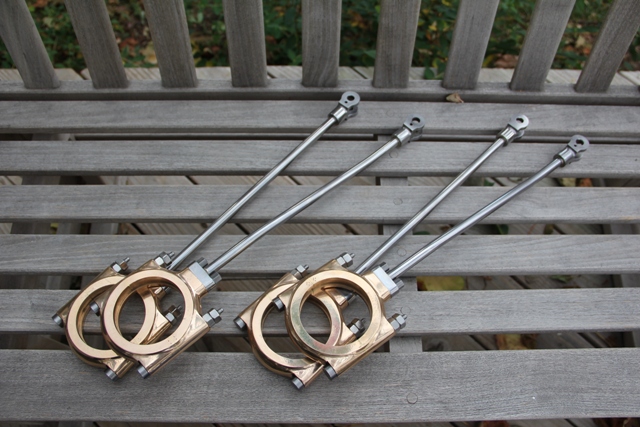
I have also started to whittle down the steel bars that will be the connection rods for the York engine. Spent about five hours in the shop yesterday and ended up with a 5 gallon pail full to the top with swarf and a nicely roughed out chunk of steel. Two pieces are ready for the though bores and finishing to size. The interrupted cut went much better than I had expected. Using the TPG style insert with the tool turned about 30 degrees seemed to reduce the amount of pounding as the tool entered work in a more progressive manner instead of taking the bite all ate once against the edge of the work as it came around to the tool. I only have one holder for this style insert which places the cutting edge perpendicular to the lathe axis hence the need to turn the toolpost.


 The photo was taken before the second, now roughed out, part was started. The order of operations so far was to blue one end of the bar and locate then center punch at the center of the bar. I don't have a drill press and the throat of my mill is too small to accommodated the 14" bar on end so I center drilled the end using the cordless drill. The bar was placed in the 4 jaw chuck and on the live center at the tailstock end then the 4 jaw was indicated in to center the axis of the bar. A wide part-off tool was used to plunge in the shoulder at the headstock end. This was to be sure that the round would was running true to the center of the bar since this end was indicated to center in the 4 jaw. The bar was removed then flipped end for end and mounted in the four jaw with the newly formed shoulder placed on the steady rest. The entire part was re-indicated in to be sure it was on axis and aligned along the lathe. The remaining end was center drilled in the lathe. This procedure should help in getting the part centered better than I could have if I had just center drilled the ends by using the cordless drill (or locating and drilling using a drill press). The steady rest was removed and the part returned to center with the live center and indicated at the four jaw as a double check before starting the removal of the material between the flanges. The large end flange will be turned to 3.00" which is the size along the longer end of the stock so taking these extra precautions to get the stock centered will pay off when the flange is machined.

Till next time

Cheers

Wednesday, January 12, 2011

My UPS man must hate me!

Before the Holidays I ordered some materials for the connecting rods of the York Compound and a chunk of bronze to make a replacement languid plate for a whistle repair. I had ordered the items several days apart but as it would happen all three boxes came on the same day. The first box had three 1.5 x 3 x 14" pieces of CRS, the second three pieces of 1.25 x 3x 4" CRS and the third box contained the 3" dia x 12 chunk of bronze. Each box weighed well into the twenty pound range each. It seems that many of the packages that come to the house contain large chucks of metal either in the form of rough material or in the ever popular tool format. Two years ago a 70 lb piece of granite arrived on the doorstep, that was a bad day for the UPS man. Sorry!

I have been ordering much of the bar stock from Online Metals. I highly recommend their establishment. The prices are competitive, they have a large selection, I can get small quantities and the first cut is at no extra cost.


The Holiday festivities took precedent over work in the shop and then the blower fan on the heater in the garage developed a cracked fan blade and its been a cold here in Colorado so not much progress has been made in the last few weeks. I do love my garage heater, even with the recent problems with the fan. It's a Mr. Heater 45,000 btu unit natural gas heater and it's far superior to the Kerosene space heater that I suffered with for the last ten years. A new fan blade is on the way and Kudos to the customer service at Mr. Heater.


If any of you received an iPhone from Santa (or already owned one) check out the machining app from Machinist Journeyman. It's geared toward CNC machinists but the app is helpful for us home manual machinist as well. I like the drill point length calculator. I'll post more as I use the app a bit. The standard disclaimer applies.


Hope your New Year goes well, Cheers!

Sunday, November 7, 2010

It's been a while since I had originally set up this blog page but I guess I had start showing something.

I am building a marine steam engine. Specifically, the York Compound engine designed by John York from castings offered through the Elliot Bay Steam Launch Company. I intend to show some of the progress photos as I progress through the build of this engine though as often is the case with the build there will be bursts of work separated by long intervals of interruptions. Life often gets in the way of these kinds of projects. I expect the project to take another few years to complete just as it's taken a few years to get to where I am currently at. I do have about 35% of the parts completed so far but it's been mostly the smaller items I have been learning as I go along and its easier to replace stock material than a messed up casting so that is were I started.

I am a novice machinist and this is my second machining project. My first was a set of Stirling Engines that I had made as gifts for my father and father-in-law. They turned out quite nicely and I have been told that low temperature differential Stirling engined are quite challenging. I think, as with anything if you take your time and learn from mistakes you can accomplish nearly anything you set out to do.

I thought I would start out with the parts that I have most recently completed, the eccentric strap and reach rod assemblies. The eccentric straps are supplied as bronze castings and have been machined and polished. The reach rods are fabricated from 1018 CRS components that have been brazed to join together and then polished as well.

I really like the look of polished steel. I am a bit worried about corrosion in a marine environment and am considering having the steel parts bright nickle plated at some time before the engine is assembled.


The eccentric sheaves are polished bronze. I have purposefully not polished to a jewelry like finish. The finish is mainly to "normalize" the surface of the sand cast parts. Several museum visits and study of photos of vintage machinery from the 1880's - early 1900's suggests that most machinery was finished to a quite high level of workmanship. Even if the castings were not polished it appears that not a small amount of labor was placed in removal of casting marks and smoothing of the surface left during the sand casting process. This process is called fettling and it's a lot of work. At some time later I may give more of a step-by-step description including some of the tools that I have learned work well.


The eccentric straps (the bronze parts) are one of my first attempts at machining cast parts. The bronze machines very nicely but setting up the parts takes a lot of thought and planning to make sure that the part you want to end up with stays within the material that you start out with.

That's all for now. Hope you enjoy my ramblings.